
What's up, folks! It's time for ROUND FOUR! This round I was coming off of a crushing defeat last round, and a hilarious explosive cataclysm-defeat the one before that. I came in a bit more ferocious than previous rounds, but also less prepared because life got in the way of researching the Mission rules. But, let's see how it went, shall we?
*A caveat at the beginning here, it's been quite a while since that game as of my writing this, so forgive me if it's a bit slapdash/light on details, but I should get the gist
First, this round brought back Vanguard Strike - which any gamers I play with will know I seriously dislike, because the measurements provided are pretty unhelpful for figuring out where exactly the lines are...
Deployment - Vanguard Strike,

For our mission, we had The Relic,

Modified -
First Blood is only awarded for killing a Non-Troop unit
The Unit controlling the Relic takes 1 Mortal Wound at the start of the Morale Phase
Advanced Battlefield Terrain rules are now in effect (this we largely skipped over in-game, because neither of us had had time to really brush up on them)
Points - 1500, 4'x6'
I brought an updated list to this one. I used pretty much the same list I had the previous round:

...but I made the change of having my Jetbikes (except for the Autarch) in a Craftworlds Outrider Detachment, and tweaking the list to add a Farseer on Jetbike, Warlock on Jetbike, as well as a third unit of Windriders with Shuriken Cannons, and taking out the Crimson Hunter for this round. I wanted more bodies on the table.
My intention was to use a blob of all of the Jetbikes, with the Autarch's re-roll 1's to-hit aura, the Warlock's Conceal, Farseer's Doom, and the Craftworld's Battle Focus to great effect. While the Autarch would wind up the only unit in the blob with Strength from Death, it made the Jetbikes insanely effective, and much more durable. Battle Focus lets them rocket around the board 22" per turn without any loss of accuracy on those Shuriken Cannons. Doom is there to make sure they do work on hard targets, and the Autarch makes them even more pinpoint accurate, while Conceal makes enemies hit every unit within 3" of the Warlock at a -1 to-hit.
My opponent turned out to be Space Wolves! A new player, who I've seen at the shop all the time, but had only just gotten into 40k for 8th (woo! New blood!) and was going pure-Space Wolves in what I would call a fluffy and "gentlemanly" list.
He brought some teeth too:
Logan Grimnar on Chariot (Warlord, Tenacious Survivor)
Bjorn the Fell-Handed
Rune Priest in Terminator Armor
5x Wulfen
3x Thunderwolf Cavalry
5x Long Fangs (2x Lascannons, 1x Missile Launcher, 2x Heavy Bolters)
Predator (triple Lascannons)
Sadly, I didn't take detailed notes on wargear and such, but that's the gist. He hadn't picked powers for his Rune Priest ahead of time, so in a show of sterling sportsmanship (although I did offer to let him pick anyway) he rolled for a random power from the table and got Jaws of the World Wolf. Which, while not as scary as it used to be, is still real scary.
He won the roll to pick sides, and we started deployment. Since his list was largely Elite and very small, it took me quite a bit longer to deploy my MSU (Multiple Small Units) army, and he got first turn easily, and I wasn't able to seize (curses!)

See above for Deployment and the Dab - rar!
I've tangled with Space Wolves before, and while I haven't gotten steamrolled by them as badly as some other armies, they've got my number in CC without any effort at all. This is my first time facing them in 8th though, and I had the advantage of numbers.

But. I was also facing down no less than five Lascannons and Bjorn's Assault Cannon, so I was fully expecting my Wraithlord and Raider to go up in puffs of smoke real fast. I deployed to bring my jetbikes to bear on those Long Fangs ASAP, but wasn't sure how I was going to deal with the Predator, screened as it was behind so many hard-hitters.

So, fingers crossed, right? Let's see how this goes!
Space Wolves, Turn 1-

As one would expect Space Wolves to do, he rushed forward at top speed with everything but the Long Fangs, Advancing with just about everything except the Predator. Moving the Predator was maybe an odd choice since it meant getting the -1 to-hit with it's Lascannons, but it did give him a cleaner field of fire on my lines and the Objective, so it certainly wasn't a bad move. And doing it early meant that he had less loss of accuracy later in the game.
...That said his to-hit rolls were *terrible,* some of the worst I've ever seen (and that's me talking) and I wound up taking zero casualties (!) and only a single Wound on the Raider (!!) with that 5++ vs. shooting seriously doing some work.
He'd been out of range for Psychic powers and Assaults, so it was a very short first turn, and a huge amount of breathing room for me since I'd expected to take a pasting to that first volley.
So, on to:
Aeldari, Turn 1 -

I was almost as predictable, leaving most of my lines back behind the pipes (but not retreating) while Advancing with my Jetbikes at top speed. I managed to trigger Conceal on my Warlock and Eldrad failed Guide AND Fortune on my Wraithlord. Sigh.
Still, my dice were average, with all the re-roll of 1's and tons of shots, so my Disintegrator Cannon and Shuriken Cannons doing terrible damage. The Wolves rolled some hot saves, but I pulled off some casualties where I needed them, taking down two Wulfen and a Long Fang. The Wulfen were a big victory, although with a 4+ they shouldn't be too hard to bring down, they're the ones I did *not* want making it to my lines at full strength.
I couldn't (didn't want to) make any charges, so all of Turn 1 was fairly quick. Going on to -
Space Wolves, Turn 2 -

Here is where the Wolves stood:

Some minor casualties, and not necessarily where they'd wanted to be Turn 1, but still not much diminished, with most of their CC oomph still intact, and that Predator promising to threaten me all game long.
And here they are in the Shooting phase of Turn 2:

Here's where I started to sweat. While I was confident I could deal with the Wulfen, I wasn't sure how much of my lines they would chew through first, and/or whether or not I would still be able to deal with the Thunderwolves or Wolf Santa (fuuuuuuu-). And to make matters a bit more urgent, it was very clear I was getting charged this turn. With their ability to Advance and Charge in the same turn, and ability to re-roll Charge and Advance dice, those Wulfen were getting to me no matter what.

My experience in 7th led me to believe that Grimnar and Thunderwolves are very durable, more so than I was prepared to handle. Especially since I'd had a relatively easy time taking down a few Wulfen, I figured the rest of the list had to be WAY tougher.

Can we take a second to appreciate those models though? Even in a grainy photo and just primed, damn. Such feral majesty! Such poise!
Anyway, before the inevitable face-punching was yet another volley from this monster:

While I'd been lucky Turn 1, that didn't make the odds of a dead Raider or Wraithlord any less in later turns, with every single volley from this thing potentially turning the game. So when he Hit and Wounded my Raider with all three Lascannons, I was (I think understandably) worried.

But then that happened! If I'm gonna roll triple sixes, that was a pretty ideal moment for it. I breathed a hefty sigh of relief, and everyone else in the game shot burst out laughing. Even one more turn with the Disintegrator Cannon was a big deal for me!
It was short-lived though, because then this happened:

In Overwatch, I was lucky enough to bring one more Wulfen, and Logan failed his Charge (it's not Christmas yet, Santa!)
They made quick work of my Storm Guardians, unsurprisingly. For a brief moment, I thought one of them would actually survive, but that was before the Thunderwolves swung, so not sure why I got excited :P
on to Aeldari Turn 2 -

The Wolves' charge was a critical point in this game - when it happened, where, and how bad it wound up being were the biggest questions right from the start. And as it happened, I got incredibly lucky. I did lose my Guardians, but they were barely 100 pts from my list, and pretty much doomed from the start (sorry guys :/)
What was extra fortunate was that the Wolves had chosen to engage on the edge of my lines, so only one of my units had been in combat, so even though it was wiped out, my overall firepower was undiminished, and all the Wolves were in the open to be shot. That could not have gone better for me.
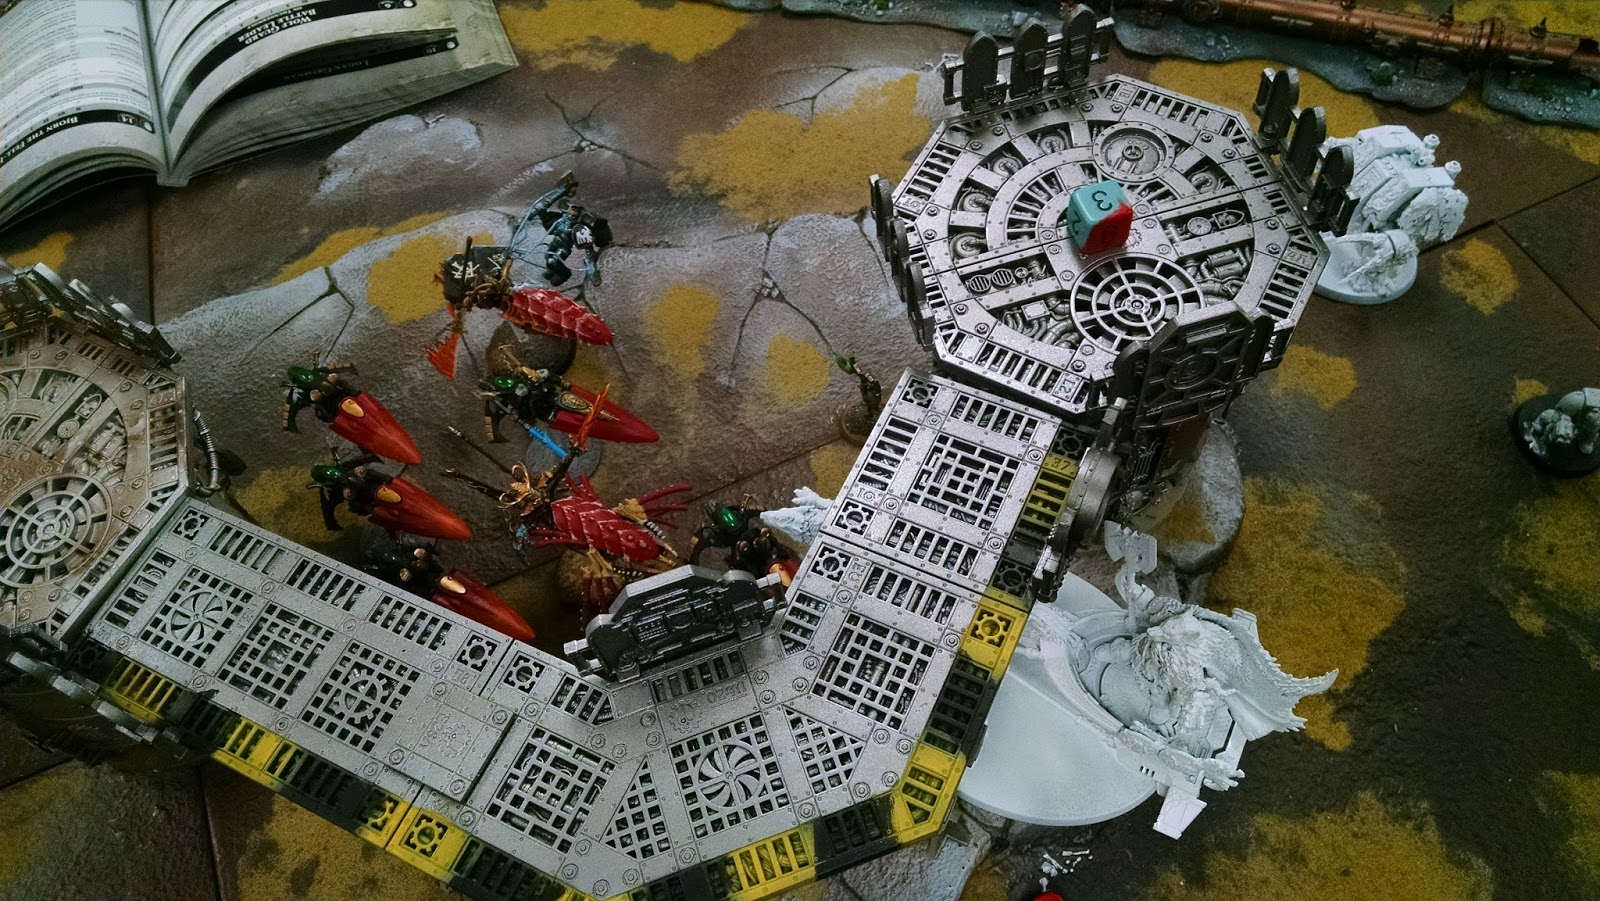
The Storm Guardians' death had triggered a Soulburst, but whatever I chose to do, it didn't make any difference. Per the photo above, it doesn't look like it did anything at all!
In any case, also seen in the photo above, the Visarch and my Kabalite Warriors hopped out of the Raider and prepared to make a stand.
Also, since obviously the main threats were right up my nose, my Jetbikes swung back up to make their presence felt.

Long story short, between my entire army's shooting, some very successful Psychic Powers, and a possibly unwise Charge from my Wraithlord, not only had I wiped the Wulfen (all two of them) and the Thunderwolves, but with Doom and some really hot dice on my side, I'd dropped Logan down to three Wounds left!
It made a big difference there that my first shot was the Autarch's Fusion Gun, and I'd rolled a smokin' hot six Damage after he'd failed his 4++
While my shooting dice were pretty good and his saves were atrocious, even with amazing dice it would have been difficult to weather that much cheddar on so few units/models.

First Blood to the Aeldari, 1 - 0
This was one of those turns that could not have gone better for me. I played correctly and got some hot rolls, but my luck there was off the charts good. The game was mine to lose as of that moment, even with the Lascannons still standing.
Space Wolves Turn 3 -

The Wolves were in a tough spot at this point. What was once an intimidating melee line was now Logan teetering on three Wounds. They weren't gone by any means, with ferocious shooting still covering a third of the board, but the majority of their hitting power was gone.

Still, Logan is no slouch, and he came in swinging against my Jetbikes, being the closest obvious threat. I opted for the Autarch no to pile-in, and let one of my Windrider units hold him off as best they could. They were quickly ground to a paste, but in dying they triggered a Soulburst from Eldrad, who pulled off Smite for a single Wound on Logan.
Backtracking a bit - in shooting, Bjorn put a dent in another Windrider unit (an Assault Cannon hitting on 2+!) and the Predator finally made a dent in my Raider, but still not quite enough to bring it down.

Aeldari Turn 3 -
It was pretty much a foregone conclusion that poor Logan was going down, but I still put a lot of fire into it, not wanting to leave it up to chance. Eldrad and the Visarch - being the slowest of my hard-hitters - stayed back with the Raider to finish off Logan, while my Wraithlord moved to get closer to the Predator, and what was left of my Jetbikes went to see if I could clean up that back-field a bit.

My photos get a bit confusing here, but I'll try to keep track of what happened as best as possible. I also moved my Kabalite Warriors, both units, to hold the Relic, and hope they wouldn't get shot as they were chipped away by the "Curse."
Some of my bikes made quick work of the remaining Long Fangs, but around here is where I learned some valuable life lessons. High on that list being that Bjorn the Fell Handed is Toughness 9. Now, T9 is whole worlds different than the T7 I'm used to topping out at, or even the extreme edge case of T8. But T9, hoo boy. Even in the "everything dies" edition that is 8th, Toughness 9 is not something I want to tangle with.
All of those thoughts occurred to me *after* I chose to Charge him with my Autarch. Oops?
Logan did go down though, I'm sure he'll be back for Christmas!
Slay the Warlord to the Aeldari, 2 - 0

I did a whopping total of 1 Wound to Bjorn with both my Warlock and Autarch in both shooting and CC. In return, he very nearly murked both of them with massive damage, but I rolled smoking hot saves - again. Boy was that lucky!

Let's look at the state of the game here, going into Turn 4. In the above photo, you can see that my Raider has taken some damage, but the Predator decided to start shooting my Wraithlord and is making short work of it. Also the 2+ on the Rune Priest is proving very resilient, on top of Bjorn's ungodly durability.
While I am in the lead, and by quite a bit here, I'm also uncomfortably aware of how little it would take for even those few units (and some unlucky rolls from me) to turn the tide back against me.

Space Wolves Turn 4 -

With nearly everything in combat, movement for the Wolves was a non-issue, so he went right to the important stuff: shooting. Here we can see my Wraithlord being quickly whittled down, as I'd expected to be happening from the start, but now that I needed him to, you know, do things he was going to die very quickly.

Combat was a nail biter, with my Autarch going down to *one* Wound, and that only barely with a 6+ from Tenacious Survivor after already losing the damage. This was very lucky that he survived at all, and I knew I needed to get him the heck out of there in my turn.
I'd only stayed there as long as I had because I was trying to keep Bjorn from shooting, and that at least worked, although it was at serious cost. Could have been worse though!
Aeldari Turn 4 -
First things first - get that Autarch outta dodge! Here was my tricky move: I zoomed him out of Combat and within 6" of the Predator. Rear armor too, just out of 7th Ed. habit ;)
Then, I got every single surviving unit in my army ringing the last few Wolves. Well, everyone except my Warriors, who were slowly getting eaten by the cursed Relic. Still, they were doing their job, and they were holding!
In the Psychic phase, I spammed Smite, with the Warlock doing 1 Wound, the Farseer getting Denied by the Rune Priest, and Eldrad chipping a few Wounds off. The Farseer then succeeded in getting Doom on Bjorn, and Eldrad threw Guide to the nearest Jetbike unit on the tower, just in case.
Turns out, even Bjorn can't stand up to that kind of firepower, although it was close. He made quite a few saves and I failed a lot of Wounds, even with the re-roll from Doom, but in the end I did get him. My Autarch, who I'd expected to make short work of the Predator, kept rolling 1's for Damage, and in the end did very little, but did make it nervous.
For good measure, the Visarch Charged the Rune Priest, but quickly found himself outmatched against the Force Axe and 2+/4++. It didn't go too badly, but hardly as decisive as I'd hoped!

Space Wolves Turn 5 -

With only two models left on the table, the Wolves turn was pretty short, and I did get a reprieve because the Predator was hitting on 4+. Still, it was enough to paste my Wraithlord :P
Combat with the Visarch continued, but neither of us was victorious
Aeldari Turn 5 -
I kept chipping down the Predator, survived the fight with the Rune Priest, and at the end of the day, held the Relic.

This mission was all-or nothing, so the Relic was an automatic win. But even without that, I was sitting on Linebreaker and Slay the Warlord against First Blood.
It was a good game, but I got spectacularly lucky, and literally everything went my way (aside from failing all kinds of Psychic tests). Even in list-building, the Wolves in that list are hard-hitters, for sure, but it was an army made up of most of the most expensive single models in the Index, meaning that I had a massive advantage in bodies on the table. That was hugely in my favor.
Still, had the Predator not whiffed for the first two turns, had Santa not failed his first Charge, had the Wulfen and the Thunderwolves tied up multiple units in Combat... Heck, even Bjorn having been in front and soaking fire while I tried to kill him first. There were plenty of ways my luck could have run out, and any one of those changes would have made the game far more difficult for me.
As it was though, everything went my way, and I pulled out my first win in three rounds! Great game, great opponent good to see the Wolves again - although I certainly wish them better luck in for future.
Deployment - Vanguard Strike,

For our mission, we had The Relic,

Modified -
First Blood is only awarded for killing a Non-Troop unit
The Unit controlling the Relic takes 1 Mortal Wound at the start of the Morale Phase
Advanced Battlefield Terrain rules are now in effect (this we largely skipped over in-game, because neither of us had had time to really brush up on them)
Points - 1500, 4'x6'
I brought an updated list to this one. I used pretty much the same list I had the previous round:

...but I made the change of having my Jetbikes (except for the Autarch) in a Craftworlds Outrider Detachment, and tweaking the list to add a Farseer on Jetbike, Warlock on Jetbike, as well as a third unit of Windriders with Shuriken Cannons, and taking out the Crimson Hunter for this round. I wanted more bodies on the table.
My intention was to use a blob of all of the Jetbikes, with the Autarch's re-roll 1's to-hit aura, the Warlock's Conceal, Farseer's Doom, and the Craftworld's Battle Focus to great effect. While the Autarch would wind up the only unit in the blob with Strength from Death, it made the Jetbikes insanely effective, and much more durable. Battle Focus lets them rocket around the board 22" per turn without any loss of accuracy on those Shuriken Cannons. Doom is there to make sure they do work on hard targets, and the Autarch makes them even more pinpoint accurate, while Conceal makes enemies hit every unit within 3" of the Warlock at a -1 to-hit.
My opponent turned out to be Space Wolves! A new player, who I've seen at the shop all the time, but had only just gotten into 40k for 8th (woo! New blood!) and was going pure-Space Wolves in what I would call a fluffy and "gentlemanly" list.
He brought some teeth too:
Logan Grimnar on Chariot (Warlord, Tenacious Survivor)
Bjorn the Fell-Handed
Rune Priest in Terminator Armor
5x Wulfen
3x Thunderwolf Cavalry
5x Long Fangs (2x Lascannons, 1x Missile Launcher, 2x Heavy Bolters)
Predator (triple Lascannons)
Sadly, I didn't take detailed notes on wargear and such, but that's the gist. He hadn't picked powers for his Rune Priest ahead of time, so in a show of sterling sportsmanship (although I did offer to let him pick anyway) he rolled for a random power from the table and got Jaws of the World Wolf. Which, while not as scary as it used to be, is still real scary.
He won the roll to pick sides, and we started deployment. Since his list was largely Elite and very small, it took me quite a bit longer to deploy my MSU (Multiple Small Units) army, and he got first turn easily, and I wasn't able to seize (curses!)

See above for Deployment and the Dab - rar!
I've tangled with Space Wolves before, and while I haven't gotten steamrolled by them as badly as some other armies, they've got my number in CC without any effort at all. This is my first time facing them in 8th though, and I had the advantage of numbers.

But. I was also facing down no less than five Lascannons and Bjorn's Assault Cannon, so I was fully expecting my Wraithlord and Raider to go up in puffs of smoke real fast. I deployed to bring my jetbikes to bear on those Long Fangs ASAP, but wasn't sure how I was going to deal with the Predator, screened as it was behind so many hard-hitters.

So, fingers crossed, right? Let's see how this goes!
Space Wolves, Turn 1-

As one would expect Space Wolves to do, he rushed forward at top speed with everything but the Long Fangs, Advancing with just about everything except the Predator. Moving the Predator was maybe an odd choice since it meant getting the -1 to-hit with it's Lascannons, but it did give him a cleaner field of fire on my lines and the Objective, so it certainly wasn't a bad move. And doing it early meant that he had less loss of accuracy later in the game.
...That said his to-hit rolls were *terrible,* some of the worst I've ever seen (and that's me talking) and I wound up taking zero casualties (!) and only a single Wound on the Raider (!!) with that 5++ vs. shooting seriously doing some work.
He'd been out of range for Psychic powers and Assaults, so it was a very short first turn, and a huge amount of breathing room for me since I'd expected to take a pasting to that first volley.
So, on to:
Aeldari, Turn 1 -

I was almost as predictable, leaving most of my lines back behind the pipes (but not retreating) while Advancing with my Jetbikes at top speed. I managed to trigger Conceal on my Warlock and Eldrad failed Guide AND Fortune on my Wraithlord. Sigh.
Still, my dice were average, with all the re-roll of 1's and tons of shots, so my Disintegrator Cannon and Shuriken Cannons doing terrible damage. The Wolves rolled some hot saves, but I pulled off some casualties where I needed them, taking down two Wulfen and a Long Fang. The Wulfen were a big victory, although with a 4+ they shouldn't be too hard to bring down, they're the ones I did *not* want making it to my lines at full strength.
I couldn't (didn't want to) make any charges, so all of Turn 1 was fairly quick. Going on to -
Space Wolves, Turn 2 -

Here is where the Wolves stood:

Some minor casualties, and not necessarily where they'd wanted to be Turn 1, but still not much diminished, with most of their CC oomph still intact, and that Predator promising to threaten me all game long.
And here they are in the Shooting phase of Turn 2:

Here's where I started to sweat. While I was confident I could deal with the Wulfen, I wasn't sure how much of my lines they would chew through first, and/or whether or not I would still be able to deal with the Thunderwolves or Wolf Santa (fuuuuuuu-). And to make matters a bit more urgent, it was very clear I was getting charged this turn. With their ability to Advance and Charge in the same turn, and ability to re-roll Charge and Advance dice, those Wulfen were getting to me no matter what.

My experience in 7th led me to believe that Grimnar and Thunderwolves are very durable, more so than I was prepared to handle. Especially since I'd had a relatively easy time taking down a few Wulfen, I figured the rest of the list had to be WAY tougher.
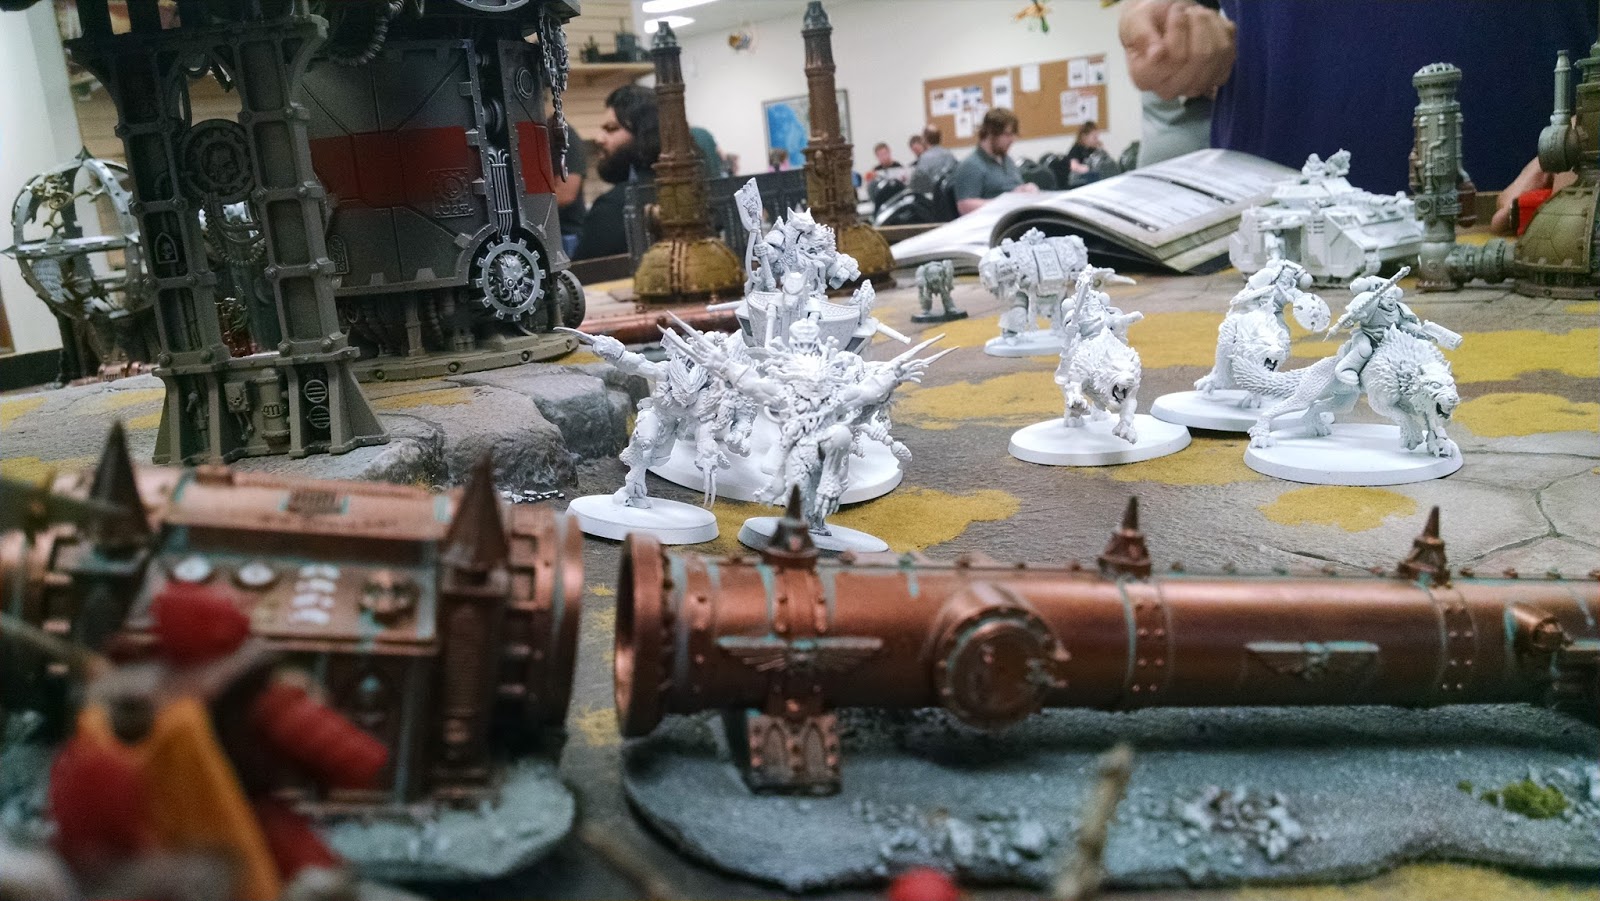
Can we take a second to appreciate those models though? Even in a grainy photo and just primed, damn. Such feral majesty! Such poise!
Anyway, before the inevitable face-punching was yet another volley from this monster:

While I'd been lucky Turn 1, that didn't make the odds of a dead Raider or Wraithlord any less in later turns, with every single volley from this thing potentially turning the game. So when he Hit and Wounded my Raider with all three Lascannons, I was (I think understandably) worried.

But then that happened! If I'm gonna roll triple sixes, that was a pretty ideal moment for it. I breathed a hefty sigh of relief, and everyone else in the game shot burst out laughing. Even one more turn with the Disintegrator Cannon was a big deal for me!
It was short-lived though, because then this happened:

In Overwatch, I was lucky enough to bring one more Wulfen, and Logan failed his Charge (it's not Christmas yet, Santa!)
They made quick work of my Storm Guardians, unsurprisingly. For a brief moment, I thought one of them would actually survive, but that was before the Thunderwolves swung, so not sure why I got excited :P
on to Aeldari Turn 2 -

The Wolves' charge was a critical point in this game - when it happened, where, and how bad it wound up being were the biggest questions right from the start. And as it happened, I got incredibly lucky. I did lose my Guardians, but they were barely 100 pts from my list, and pretty much doomed from the start (sorry guys :/)
What was extra fortunate was that the Wolves had chosen to engage on the edge of my lines, so only one of my units had been in combat, so even though it was wiped out, my overall firepower was undiminished, and all the Wolves were in the open to be shot. That could not have gone better for me.
The Storm Guardians' death had triggered a Soulburst, but whatever I chose to do, it didn't make any difference. Per the photo above, it doesn't look like it did anything at all!
In any case, also seen in the photo above, the Visarch and my Kabalite Warriors hopped out of the Raider and prepared to make a stand.
Also, since obviously the main threats were right up my nose, my Jetbikes swung back up to make their presence felt.

Long story short, between my entire army's shooting, some very successful Psychic Powers, and a possibly unwise Charge from my Wraithlord, not only had I wiped the Wulfen (all two of them) and the Thunderwolves, but with Doom and some really hot dice on my side, I'd dropped Logan down to three Wounds left!
It made a big difference there that my first shot was the Autarch's Fusion Gun, and I'd rolled a smokin' hot six Damage after he'd failed his 4++
While my shooting dice were pretty good and his saves were atrocious, even with amazing dice it would have been difficult to weather that much cheddar on so few units/models.

First Blood to the Aeldari, 1 - 0
This was one of those turns that could not have gone better for me. I played correctly and got some hot rolls, but my luck there was off the charts good. The game was mine to lose as of that moment, even with the Lascannons still standing.
Space Wolves Turn 3 -

The Wolves were in a tough spot at this point. What was once an intimidating melee line was now Logan teetering on three Wounds. They weren't gone by any means, with ferocious shooting still covering a third of the board, but the majority of their hitting power was gone.

Still, Logan is no slouch, and he came in swinging against my Jetbikes, being the closest obvious threat. I opted for the Autarch no to pile-in, and let one of my Windrider units hold him off as best they could. They were quickly ground to a paste, but in dying they triggered a Soulburst from Eldrad, who pulled off Smite for a single Wound on Logan.
Backtracking a bit - in shooting, Bjorn put a dent in another Windrider unit (an Assault Cannon hitting on 2+!) and the Predator finally made a dent in my Raider, but still not quite enough to bring it down.
Aeldari Turn 3 -
It was pretty much a foregone conclusion that poor Logan was going down, but I still put a lot of fire into it, not wanting to leave it up to chance. Eldrad and the Visarch - being the slowest of my hard-hitters - stayed back with the Raider to finish off Logan, while my Wraithlord moved to get closer to the Predator, and what was left of my Jetbikes went to see if I could clean up that back-field a bit.

My photos get a bit confusing here, but I'll try to keep track of what happened as best as possible. I also moved my Kabalite Warriors, both units, to hold the Relic, and hope they wouldn't get shot as they were chipped away by the "Curse."
Some of my bikes made quick work of the remaining Long Fangs, but around here is where I learned some valuable life lessons. High on that list being that Bjorn the Fell Handed is Toughness 9. Now, T9 is whole worlds different than the T7 I'm used to topping out at, or even the extreme edge case of T8. But T9, hoo boy. Even in the "everything dies" edition that is 8th, Toughness 9 is not something I want to tangle with.
All of those thoughts occurred to me *after* I chose to Charge him with my Autarch. Oops?
Logan did go down though, I'm sure he'll be back for Christmas!
Slay the Warlord to the Aeldari, 2 - 0

I did a whopping total of 1 Wound to Bjorn with both my Warlock and Autarch in both shooting and CC. In return, he very nearly murked both of them with massive damage, but I rolled smoking hot saves - again. Boy was that lucky!

Let's look at the state of the game here, going into Turn 4. In the above photo, you can see that my Raider has taken some damage, but the Predator decided to start shooting my Wraithlord and is making short work of it. Also the 2+ on the Rune Priest is proving very resilient, on top of Bjorn's ungodly durability.
While I am in the lead, and by quite a bit here, I'm also uncomfortably aware of how little it would take for even those few units (and some unlucky rolls from me) to turn the tide back against me.

Space Wolves Turn 4 -

With nearly everything in combat, movement for the Wolves was a non-issue, so he went right to the important stuff: shooting. Here we can see my Wraithlord being quickly whittled down, as I'd expected to be happening from the start, but now that I needed him to, you know, do things he was going to die very quickly.

Combat was a nail biter, with my Autarch going down to *one* Wound, and that only barely with a 6+ from Tenacious Survivor after already losing the damage. This was very lucky that he survived at all, and I knew I needed to get him the heck out of there in my turn.
I'd only stayed there as long as I had because I was trying to keep Bjorn from shooting, and that at least worked, although it was at serious cost. Could have been worse though!
Aeldari Turn 4 -
First things first - get that Autarch outta dodge! Here was my tricky move: I zoomed him out of Combat and within 6" of the Predator. Rear armor too, just out of 7th Ed. habit ;)
Then, I got every single surviving unit in my army ringing the last few Wolves. Well, everyone except my Warriors, who were slowly getting eaten by the cursed Relic. Still, they were doing their job, and they were holding!
In the Psychic phase, I spammed Smite, with the Warlock doing 1 Wound, the Farseer getting Denied by the Rune Priest, and Eldrad chipping a few Wounds off. The Farseer then succeeded in getting Doom on Bjorn, and Eldrad threw Guide to the nearest Jetbike unit on the tower, just in case.
Turns out, even Bjorn can't stand up to that kind of firepower, although it was close. He made quite a few saves and I failed a lot of Wounds, even with the re-roll from Doom, but in the end I did get him. My Autarch, who I'd expected to make short work of the Predator, kept rolling 1's for Damage, and in the end did very little, but did make it nervous.
For good measure, the Visarch Charged the Rune Priest, but quickly found himself outmatched against the Force Axe and 2+/4++. It didn't go too badly, but hardly as decisive as I'd hoped!

Space Wolves Turn 5 -

With only two models left on the table, the Wolves turn was pretty short, and I did get a reprieve because the Predator was hitting on 4+. Still, it was enough to paste my Wraithlord :P
Combat with the Visarch continued, but neither of us was victorious
Aeldari Turn 5 -
I kept chipping down the Predator, survived the fight with the Rune Priest, and at the end of the day, held the Relic.

This mission was all-or nothing, so the Relic was an automatic win. But even without that, I was sitting on Linebreaker and Slay the Warlord against First Blood.
It was a good game, but I got spectacularly lucky, and literally everything went my way (aside from failing all kinds of Psychic tests). Even in list-building, the Wolves in that list are hard-hitters, for sure, but it was an army made up of most of the most expensive single models in the Index, meaning that I had a massive advantage in bodies on the table. That was hugely in my favor.
Still, had the Predator not whiffed for the first two turns, had Santa not failed his first Charge, had the Wulfen and the Thunderwolves tied up multiple units in Combat... Heck, even Bjorn having been in front and soaking fire while I tried to kill him first. There were plenty of ways my luck could have run out, and any one of those changes would have made the game far more difficult for me.
As it was though, everything went my way, and I pulled out my first win in three rounds! Great game, great opponent good to see the Wolves again - although I certainly wish them better luck in for future.
Comments
Post a Comment